My Garage
Cart
Make sure this part fits

Kia 4311939030 Oil Seal

2003-2019 Kia

Customer Questions & Expert Answers (8)
4311939030 Kia Oil Seal Product Photo 1 of 2
  • Part Description
    Seal-Oil
  • Part Code
    43119
  • Replaced By
    4311939080
  • Manufacturer
    Kia
Make sure this part fits
$10.05 MSRP: $13.62
You Save: $3.57 (27%)
Ships in 1-3 Business Days
1
ADD TO CART
  • Related Parts
  • Product Specifications
  • Vehicle Fitment
  • Customer Questions & Expert Answers
  • Product Specifications

    BrandGenuine Kia
    Part Code43119
    Manufacturer Part Number4311939030
    Part DescriptionSeal-Oil
    Manufacturer NoteT/M CASE SIDE-LH
    Item Dimensions9.5 x 5.3 x 2.0 inches
    Item Weight0.30 Pounds
    ConditionNew
    Fitment TypeDirect Replacement
    ManufacturerKia
    SKU4311939030
    WarrantyThis genuine Kia part is guaranteed by Kia's factory warranty.
    Shipping & ReturnShipping Policy Return Policy
    Warning: California's Proposition 65
  • Vehicle Fitment

    Year Make Model Trim & Engine Important vehicle option details
    2004-2009 Kia AmantiLow Grade, Middle Grade|3.5L, 3.8L, 3.8L - Lambda4 Door Sedan, Sedan - 4Door 5P
    2009-2016 Kia Forte1.6L - GAMMA, 1.8L - NU, 2.0L - NU, 2.0L - Theta 2, 2.4L - Theta 2Coupe - 2Door 5P, Sedan - 4Door 5P, Sedan - 5Door 5P
    2009-2016 Kia Forte Koup1.6L - GAMMA, 1.8L - NU, 2.0L - NU, 2.0L - Theta 2, 2.4L - Theta 2Coupe - 2Door 5P, Sedan - 4Door 5P, Sedan - 5Door 5P
    2006-2013 Kia OptimaHigh Grade, Middle Grade|2.4L, 2.4L - Theta 2, 2.4L - Theta FF, 2.7L, 2.7L - MU4 Door Sedan, Sedan - 4Door 5P
    2005-2017 Kia RioHigh Grade|1.6L, 1.6L - Alpha DOHC, 1.6L - GAMMA4 Door Sedan, 5 Door Sedan, Sedan - 4Door 5P, Sedan - 5Door 5P
    2006-2011 Kia RondoHigh Grade, Middle Grade|2.4L, 2.4L - Theta 2, 2.4L - Theta FF, 2.7L, 2.7L - MU5 Door Wagon, 5 Door Wagon 7, Wagon - 5Door 5P, Wagon - 5Door 7P
    2006-2014 Kia SedonaHigh Grade, Middle Grade|3.5L - Lambda 2, 3.8L, 3.8L - LambdaWagon Long - 7P, Wagon Long 7, Wagon Short - 7P, Wagon Short 7
    2009-2012 Kia Sorento2.4L - Theta 2Wagon - 5Door 5P
    2009-2019 Kia Soul1.6L - GAMMA, 2.0L - Beta, 2.0L - NUWagon - 5Door 5P
    2003-2009 Kia SpectraHigh Grade, Middle Grade|2.0L, 2.0L - Beta4 Door Sedan, 5 Door Sedan, Sedan - 4Door 5P
    View More
  • Customer Questions & Expert Answers

    Q:
    I want to confirm that this is the proper part for this vin number before i order Posted by KiaPartsNow Specialist
    A:
    You can Select Your Vehicle to check if 4311939030 fits your vehicle.
    Posted by KiaPartsNow Specialist
    Q:
    How to replace the Camshaft Seal and Crankshaft Seal on a Kia Sorento V6 engine? Posted by Customer
    A:
    To pull out the crankshaft front oil seal on 2006 and earlier models, you have to remove the timing belt together with the crankshaft sprocket; and the faces of the sensor ring as well as the spacer behind it. Specs remove the crankshaft pulley for models manufactured on or after 2007. Gently twist the seal open with a screwdriver or the seal opener making sure that it does not harm the housing bore or the crank shaft because this will cause leaking with the new seal. Debris the bore in the engine and apply a thin layer of engine oil or multipurpose grease on the outer perimeter of the new seal as well as to the seal lips. A seal driver or a socket slightly smaller than the OD of the new seal must be used to force the new seat in the housing with a hammer; one may assure that the new seat is inserted at the same depth as the original and square to the bore. One must ensure the spring is in place afterwards. Install the crankshaft timing sprocket and the timing belt and start the car to confirm if it leaks oil at the front seal. For camshaft oil seals on 2006 and earlier models, first, unscrew the timing belt and the camshaft sprocket(s), and then unscrew the rear timing belt cover. Observe the depth of the seal before lifting it up with a screwdriver, ensure you do not injure the bore or the camshaft. Scrub the bore and before installing the new seal apply some engine oil or the multi-purpose grease, to the circumference of the seal on the seal lip side. Insert the new seal into place with the seal driver or socket which should ensure that the new seal is properly aligned and at the depth equal to that of the old one. Replace back the rear timing belt cover and fasten the bolts; replace back the camshaft sprocket(s) and timing belt and ensure that all the timing marks are lined well to minimize major engine breakdown. Last but not the least, it is suggested to start the engine and examine as well as search for the drop of oil at the camshaft seal.
    Posted by KiaPartsNow Specialist
    Q:
    How to properly replace the Transfer Case Seal and reinstall the driveshaft on a Kia Sorento? Posted by Customer
    A:
    Raise the vehicle and support it securely on jackstands, then drain the fluid from the transfer case. Remove the rear driveshaft and mark the relative positions of the pinion, nut, and flange. Use a beam- or dial-type inch-pound torque wrench to determine the torque required to rotate the pinion, recording it for later use. Count the number of threads visible between the end of the nut and the end of the pinion shaft, and record that as well. Remove the flange mounting nut, using a chain wrench to hold the pinion flange while loosening the locknut, and then remove the companion flange, which may require a small puller. Pry out the seal with a screwdriver or seal removal tool, taking care not to damage the seal bore. Lubricate the lips of the new seal with multi-purpose grease and tap it evenly into position with a seal installation tool or a large socket, ensuring it enters the housing squarely and is tapped to its full depth. Align the mating marks made before disassembly and install the companion flange, tightening the pinion nut if necessary to draw the flange into place. Carefully tighten the nut until the original number of threads are exposed and the marks are aligned, then measure the torque required to rotate the pinion, tightening the nut in small increments until it matches the previously recorded figure. Finally, install the driveshaft and add the specified lubricant to the transfer case.
    Posted by KiaPartsNow Specialist
    Q:
    How to replace the camshaft seal on Kia Spectra for four cylinder engine? Posted by Customer
    A:
    Apart from 2.0L DOHC engines, the initial step is to take off the timing belt, camshaft sprocket bolt(s), and sprocket(s). Tap gently and remove the camshaft seal by pulling it out of the bore with a thin flat headed screwdriver, there is no need of scratching the camshaft or seal bore. Another way is to make a hole in the seal located in the bore and sccrew a small screw into this hole while withdrawing the seal. Dip the new camshaft oil seal in clean engine oil while it's still on the lip and push it slightly into the slot. Press it into the bore with a seal driver or a socket having an outside diameter slightly smaller than that of the oil seal driving it in until it is flush with the edge of the camshaft cap or into the cylinder head provided it reaches the depth or original groove limit. Refit the remaining of parts in the reverse sequence and start the engine and test for its proper functioning. To dismantle on the 2.0L DOHC engine, you will require to; Remove the timing cover, timing belt together with the camshaft timing belt sprocket. It is preferred to remove the old camshaft seal by-hand with the help of a seal removal tool. Scrub off the old oil seal cover, apply a little clean engine oil on the lip of a new camshaft oil seal and then slide it over the crown of the camshaft and bring it over the seal nose till it is parallel to the seal bore. Shear the new seal in place with a hammer for socket or a short pipe to ensure its to flush with the lower flange, or to the depth of the initial one. Last of all, fit the camshaft timing belt sprocket, timing belt and the timing cover.
    Posted by KiaPartsNow Specialist
    Q:
    How to replace the Camshaft Seal and Crankshaft Seal on a Kia Optima four-cylinder engine? Posted by Customer
    A:
    To replace the crankshaft front oil seal, first remove the crankshaft pulley and, for models from 2001 to 2006, take off the timing belts and crankshaft sprocket. Take note of the seal's installation depth and orientation, then carefully pry it out using a seal puller or a large screwdriver, ensuring not to damage the crankshaft or distort the cover; wrapping electrician's tape around the screwdriver tip can help prevent damage. Apply clean engine oil or multi-purpose grease to the outer edge of the new seal and install it with the lip facing inward, using a seal driver or a large socket and hammer to ensure it is squarely positioned at the correct depth. Lubricate the pulley hub with clean engine oil and reinstall the crankshaft pulley, tightening the retaining bolt to the specified torque. The installation process is the reverse of removal. For camshaft oil seals on models from 2001 to 2006, remove the timing belt and camshaft sprockets, then note the installation depth of the seals before prying them out with a tape-wrapped screwdriver, taking care not to scratch the bore or camshaft. Clean the bores and coat the outer edge of the new seals with oil or grease, applying grease to the lips as well. Use a seal driver or a socket slightly smaller than the seal's outer edge to carefully drive the new seals into place, ensuring they are squarely installed to the same depth as the originals. Reinstall all removed components, ensuring correct alignment of the belt and sprockets, and clean the areas around the seals to detect any future leaks. After operating the vehicle for a few days, check for leaks.
    Posted by KiaPartsNow Specialist
    Q:
    How to replace the intake camshaft seals on Kia Optima for V6 engine? Posted by Customer
    A:
    On 2001 through 2006 models, the Intake camshafts have seals at their front ends, where the timing belt drive sprockets are located, while on 2006.5 and later models, the drive sprockets are bolted to the exhaust camshafts, with cam seals located on the front ends of the exhaust cams. These seals must be replaced immediately if they start leaking, but it's advisable to replace them anytime the drive sprockets or camshafts are removed. Begin by removing the timing belt and camshaft sprockets, then note how far the seals are installed in the bores before prying them out with a screwdriver wrapped in tape, taking care not to scratch the bore or camshaft. Clean the bores and coat the outer edge of the new seals with oil or grease, also applying grease to the lips of the seals. Using a seal driver or a socket with an outside diameter slightly smaller than the outer edge of the seal, carefully drive the new seals into place with a hammer, ensuring they are installed squarely and to the same depth as the originals. Reinstall all removed components, ensuring the belt and sprockets are correctly aligned, and clean around the seals to detect any leaks later. After operating the vehicle for a few days, check for leaks.
    Posted by KiaPartsNow Specialist
    Q:
    How to replace the Camshaft Seal and Crankshaft Seal on Kia Sedona? Posted by Customer
    A:
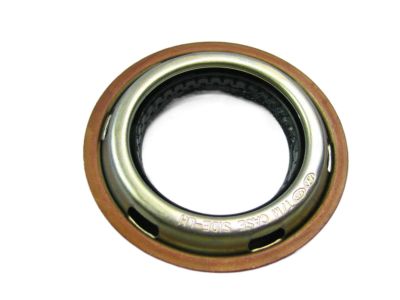
    To replace the crankshaft front oil seal on 2005 and earlier models, first remove the timing belt and crankshaft sprocket, then slip off the sensor ring and the spacer behind it. For 3.8L and 2011 and later 3.5L models, remove the crankshaft pulley. Carefully pry the seal out using a screwdriver or seal removal tool, ensuring not to scratch the housing bore or damage the crankshaft, as this could lead to leaks with the new seal. Clean the bore in the engine and coat the outer edge of the new seal with engine oil or multi-purpose grease, applying the same lubricant to the seal lip. Use a seal driver or a socket slightly smaller than the seal's outside diameter to drive the new seal into place with a hammer, ensuring it is installed squarely and to the same depth as the original, checking afterward to confirm the spring is in place. The remainder of the installation follows the reverse order of removal, and after running the engine, check for oil leaks at the front seal. For camshaft oil seals on 2005 and earlier models, remove the timing belt and camshaft sprocket(s), detach the rear timing belt cover, and note the seal's seating depth before carefully prying it out with a screwdriver wrapped in tape to avoid damage. Clean the bore and coat the new seal's outer edge with engine oil or multi-purpose grease, applying grease to the seal lip as well. Drive the new seal into place using a seal driver or a socket, ensuring it is squarely installed to the same depth as the original. Reinstall the rear timing belt cover and tighten the bolts, then reinstall the camshaft sprocket(s) and timing belt, verifying that all timing marks are aligned to prevent major engine damage. Finally, run the engine and check for oil leaks at the camshaft seal.
    Posted by KiaPartsNow Specialist
    Q:
    How to replace the Camshaft Seal and Crankshaft Seal on a Kia Sportage V6 engine? Posted by Customer
    A:
    To replace the crankshaft front oil seal, unfasten the timing belt along with the crankshaft sprocket and thereby, removing the sensor ring and the spacer placed behind it. Slowly open the seal using a screwdriver or seal removal tool because if the housing bore or crankshaft get scratched, there will be leakage with the new seal. Remove dirt from the boer in the engine and lubricate only the outer rim of the new seal as well as the seal lip with multi-purpose grease. Utilize a seal driver to delicately seat the new seal using a hammer and ensure that the position of the seal is correct since it is being put in a fully fitting position to the original position in addition to ensuring that the spring did not get displaced during this process. Replace the components that were unbolted to gain access to the seal and start the engine for oil leaks around the front seal. To address the crankshaft rear oil seal, one has to adhere to the following processes. To replace the camshaft oil seals, the timing belt and the camshaft sprockets need to be removed, paying particular attention to determining how deep into the bores the seals should go to be inserted with help of a seal removal tool or a screwdriver wrapped in a tape to prevent scratching the bores. Scrub the bores and uniformly oil or grease the outer circumference of the new seals, the sealing lip of the seals also has to be greased. Finally before completely tightening the bolts, use a seal driver to softly strike on the seals to install it squarely and to the depth of the old one. Last of it, replace all parts that you have taken off, make sure that belt and sprockets are in alignment and also clean the area around the seals so that you are to see any leaks in the future.
    Posted by KiaPartsNow Specialist
    If you have any questions about this product, please don't hesitate to ask us. We will be happy to help you!

Genuine Kia Part 4311939030, the Right Choice

For assured reliability, buy Kia part # 4311939030 Oil Seal. Also known as Camshaft Seal, Transfer Case Seal. They are produced at the official Kia factory to ensure durability and precise fit. These components undergo rigorous quality control tests to remove any defects. This will fit 2004-2009 Amanti, 2006-2013 Optima, 2006-2011 Rondo, 2005-2013 Sportage.

KiaPartsNow.com is a major distributor of genuine Kia parts and accessories including 4311939030 Oil Seal. Our site supplies OEM parts you can trust. We stock a wide range of genuine OEM parts available at reasonable prices. Besides, we have simple returns and swift delivery to ensure a seamless shopping experience.

Why choose Kia Parts Now

  • Dedicated Service

    Your complete satisfaction is our #1 goal

  • Lowest Prices

    Best deals on genuine OE parts from dealerships

  • Fast Delivery

    Orders are processed and delivered promptly